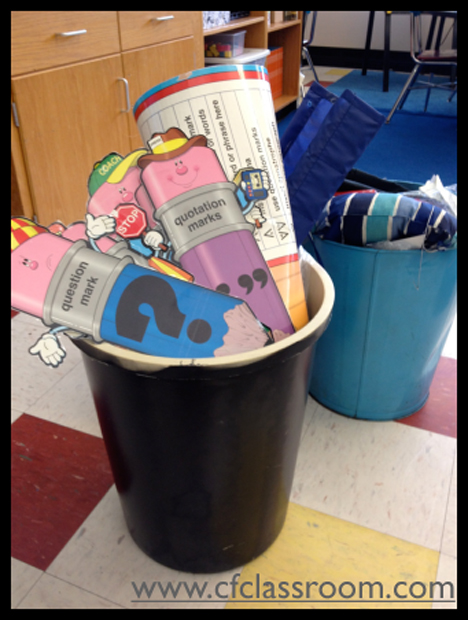
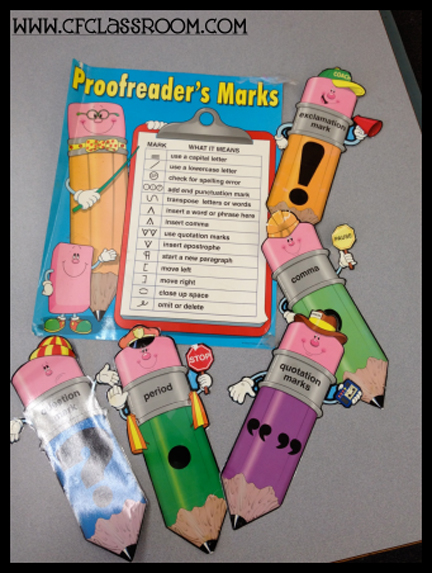
Before I get into sharing all of my anchor chart ideas with you, let’s start with a picture of my trash. Do you see that sad little pencil begging for freedom from his dumpster fate? Well, he’s kind of important because he and his friends were the last surviving “manufactured educational display” in my classroom and I recently bid them a sad farewell. It was a bit bittersweet because they had been with me for so long… too long… like more than a decade. I thought they were cute. I thought they were handy. Kids NEED to know about punctuation and editing marks, correct?
But do you know what? They in that decade+ I can’t recall ever, ever, ever seeing one of my friends (and I’ve taught Kindergarten, first, second and third grade in that time) look to these quirky little pencil friends for guidance. Instead, it was always the charts we had created together in class that were getting all the love.
Research says that kids need to “anchor their learning” by creating these charts, but I don’t always believe the latest “research.” In regards to this though, I would say it’s spot on. My friends are constantly looking to the visuals we have made together as a reference. They look up from where they’re sitting. They get out of their seats to get closer looks. They ask about charts that have been retired when they need some info. Clearly these were effective. The pretty charts, posters, diagrams, etc that I had spent a small fortune on over the years at the teacher stores… not so much. And while I’ve slowly been phasing out all of those packaged resources over time, I made a very conscious decision this year to actually banish them from my classroom. Instead, I am using anchor charts. Below I share tons of anchor chart ideas and tips!

What are Anchor Charts?
An anchor chart is an interactive tool created by teachers with the support and contributions of students in the classroom. The teacher creates a visual (usually on chart paper or on the computer) that represents the important knowledge, strategy, or process of a skill from that day’s lesson. When creating it, the teacher makes his or her thinking visible by writing down and verbalizing his or her thoughts. During the creation process and afterwards, both teachers and students can add to it. It is a working document, so new learning, discoveries, and interesting ideas can be added to it.
As the name implies, it “anchors” the learning for students, which means it is something that students can refer back to throughout the learning time as needed. The visual can come in a variety of different forms, but they fall under two main categories: handwritten and digital. Either way, the anchor chart has a single focus and is posted in a way that students can access it with ease. By posting it, students will be reminded of their learning, which will support them in making critical connections between prior learning and new learning. You can have more than one anchor chart posted at a time, but the ones posted should reflect what students are currently learning and need continued support and scaffolding with. Some anchor charts may stay up all year like ones that outline routines and expectations, while others might only be up for a couple of weeks.
Why are Anchor Charts Important?
Anchor charts are an essential tool in classrooms for many reasons. Here are the top ten reasons why.
Anchor charts…
- are a reference tool that students can refer back to as needed.
- support independent work.
- encourage students to make connections between prior learning and new learning.
- allow anyone who comes in your room (students, parents, administrators) to know what you are teaching.
- contribute to a literacy-rich classroom that promotes reading, writing, spelling, and more.
- make complex concepts more manageable.
- serve as gentle reminders regarding expectations and procedures.
- engage students in learning by inviting them to have a voice in the learning process.
- allow a teacher to model appropriate sizing and spacing of letters and numbers.
- are working documents that display growth within the classroom and can be used as a formative assessment.
Types of Anchor Charts: Handwritten vs Digital Charts
Anchor charts can come in a variety of different forms, but they fall under two categories: handwritten and digital.
Handwritten Anchor Charts
Below are the pros and cons of using handwritten anchor charts.
Pros of Using Handwritten Anchor Charts
- You are modeling letter formation and appropriate spacing.
Cons of Using Handwritten Anchor Charts
- It takes longer to handwrite something than it does to type it for most people. This results in the students sitting on the rug longer, which can lead to student misbehavior.
- It can be difficult to store the large chart paper in the classroom.
- It is difficult to make changes because you are writing with a marker.
Digital Anchor Charts
Below are the pros and cons of using digital anchor charts.
Pros of Using Digital Anchor Charts
- It is much faster typing than it is handwriting something for most people. This can reduce the amount of time on the rug, which ultimately decreases student misbehavior.
- You can save it on your computer and pull it up whenever you need it.
- You can edit it and add to it easily.
- Learners are more engaged in learning when technology is used.
Cons of Using Digital Anchor Charts
- You are not modeling letter formation or appropriate spacing like you would be when handwriting the anchor chart.
 |  |
10+ Tips for Creating Anchor Charts
Below are tips and ideas for creating an anchor chart.
How to Create Handwritten Anchor Charts
When you are creating a handwritten anchor chart, remember these tips:
- Prepare the framework ahead of time (e.g. title, learning objective, and headers).
- Use colors with dark tones for ease of use.
- Write in a way that models appropriate sizing and spacing.
- Use correct spelling.
- Use simple pictures to increase accessibility.
- Organize it to support student understanding.
- Position your body so you can face the students as much as you can.
How to Create Digital Anchor Charts
When you are creating a digital anchor chart, remember these tips:
- Project it on a big open space.
- Save the document so you can pull it back up again.
- Use large font that is clear.
- Print a copy and post it in the classroom.
How to Display Anchor Charts
There are so many ways you can display anchor charts! You’ll find tons of anchor chart ideas related to displaying them on Pinterest, but here are some simple ideas. If you use chart paper, you can utilize command hooks, clothespins hot glued to the walls, pocket charts, or an easel. If you use the computer, you can project them using a projector or print it off. After you print it off, you can post it on the wall with tape or put it in a binder for students to access. Whatever the format, it’s helpful to create a system at the beginning of the year where you can switch out anchor charts with ease.

3 Ideas for How to Store Anchor Charts
It can be difficult to find a space in your classroom to store anchor charts on chart paper. Below are 3 tips for how to store anchor charts in your elementary classroom.
- Roll it up, put a rubber band around it, and then put it in a tall decorated cardboard box or metal basket.
- Attach the anchor charts to two metal clips, attach the metal clips to two metal rings, and then hang the two metal rings on two command hooks.
- Use a pants hanger to hold the anchor chart and then hang the hanger in a closet or clothing rock on wheels.
3 Common Challenges with Anchor Charts (and Solutions)
Below are 3 reasons teachers don’t like anchor charts and strategies you can use to overcome them.
1. They Make the Classroom Look Messy
I am very particular about the look of my classroom and I thought my handmade charts looked “messy.” I overcame this by doing a few things.
First, I plan out the “bones” on my charts when I am writing my lesson plans. While the bulk of the content is generated by the students, the framework for the chart is mine. I find that having a plan is helpful.
Second, I treat it as a draft. If the chart is going on the wall, I use the opportunity to model the steps of the writing process. I am always teaching my students that our published work needs to be our best quality. This is no different. If I make a chart with the students that I don’t feel is of “display quality,” I explain that it is a draft. We write the words “Rough Draft” onto the chart. I have them analyze it with me to discuss how it could improve (e.g. more color, neater handwriting, and more visuals), make note of their suggestions, and then create an improved version after school.
Prior to hanging it up, I put the two side by side and encourage student discussion about why the new chart is ready to be “published.” I have found that this has helped so much with teaching them about editing and the importance of putting forth your best work efforts. I always let a student take home the original and often try to pick a student who will most benefit from it’s content.
Third, I add additional elements to my charts. I am NOT an artistic person. I am creative, but I am not artistic. They are clearly not one in the same. That’s where I cheat a bit. I may add in photographs or glue on clipart. I use fun fonts as a guide when printing my letters. I add borders using ribbon or tape. Or I’ve also been known to farm out the final copy to much more artistic colleagues.
2. There’s No Where to Hang Them
I love making anchor charts with my students and while I find that they reference them all the time, I don’t always know where to put them. Because real estate is at a premium in any classroom and spots are often already spoken for, I found that the charts frequently ended up getting hung wherever there was space available at the time they were made.
This was problematic for a couple of reasons:
- It made the room feel messy and unplanned {which is a big no-no}.
- The students didn’t always know where to look to find what they knew existed.
- There wasn’t a rhyme or reason to where they were placed. It was possible to have a science chart taped up on the back of a door and a weekly word sort hanging out under the math workshop board.
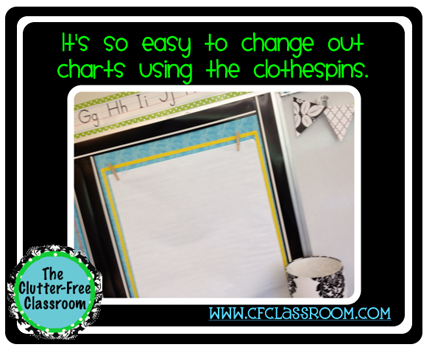
I solved that problem for the for the coming school year, by adding designated anchor chart display areas within my classroom.
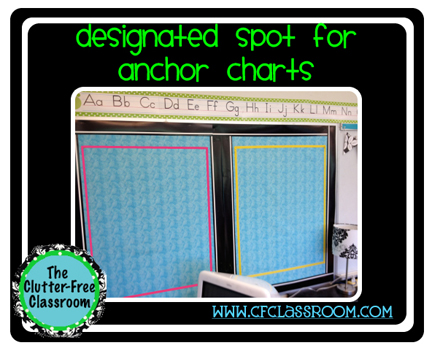
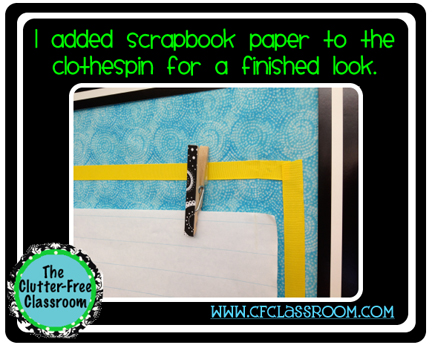
Here’s the part that I’m tooting my own horn and high-fiving myself about. In each of the designated anchor chart spaces I hot glued a pinch-style clothespin to the background fabric. That way all I need to do is pop the charts right into them. If I want to pull it down to reference during a small group or move it closer to a group working on a related task it will be super easy, And because you know I am all about the small details that make things extra special, I added a small strip of scrapbook paper that coordinates with my classroom decor. Because I may not always have something to display and didn’t want gaping holes in random spots, I strived to create a space that looked purposeful.
- I hung fabric and a border.
- I sectioned off space for the chart paper.
- And then I added more border (in the form of ribbons) to further define the space and leave it looking like something belonged there.
 |  |
3. Storage Space is Already Limited
It’s not possible to leave them all up all year so I was at a loss for what to do with that information that they would still need at a later date. In response, I came up with some ideas. I plan to take a picture of each and every chart. I am going to use those pictures in a few ways. First, I’ll use a binder to create a “photo album” of our charts. My plan is to use tabbed sections for each subject. Second, I may reduce them in size to fit several on a page and make a photocopy for each students’ notebook as we begin building up a collection. Third, I will build an ongoing Powerpoint presentation that the kids can access on the classroom computers and that I can use to project the charts onto the smart board for future reference.
In closing, we hope you found these anchor chart ideas helpful! If you did, then you may also be interested in these posts:
- Student Work Wall Display Ideas for Elementary Teachers
- How to Set Up a Writing Center in Your Classroom
- Back to School Read Alouds for Elementary Teachers