If you are a teacher looking for small classroom organization ideas, then you found the right place! As teachers, we know that when your students are able to access and return things they need such as manipulatives, it empowers them to take responsibility of themselves and their learning. While it is important for these tools to be accessible, it is equally important for these tools to be organized and stored away so they are not distracting for students.
The organization piece is especially important. It’s a safety issue when things are haphazardly stacked or blocking walkways. We know it is important to have an organized classroom. We also understand that we have small classrooms with limited storage space. The list of small classroom organization ideas below will help you maximize your space in your classroom so you can create a space that is functional, tidy, and organized.
10 Small Classroom Organization Ideas
Below are 10 organization ideas for small classrooms.
1. Utilize the Storage Space in Your Students’ Desks
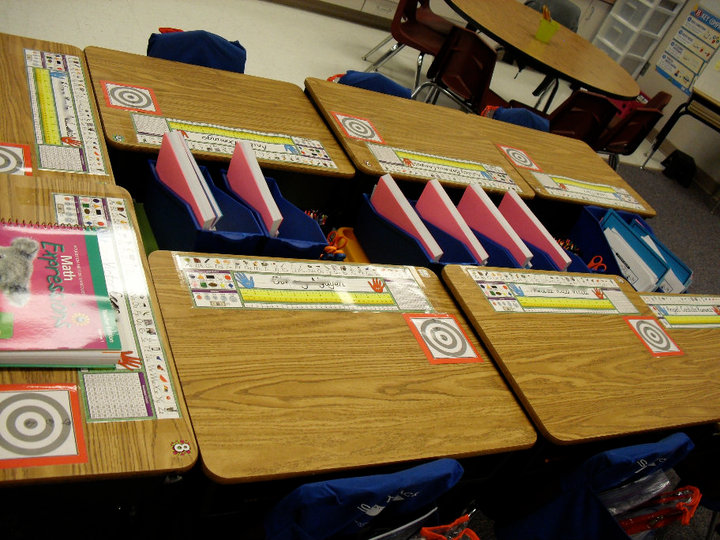
The first on the list of small classroom organization ideas is to use the storage space in students’ desks. I currently use tables instead of desks in my classroom, but I treated my desks as tables before I was able to obtain enough tables for all the students and phase out the desks. I did not have the students keep their personal belongings inside. This allowed me to use the desks for additional storage.
2. Create Storage Space In Between Students’ Desks
Kids are not naturally organized. They need someone to teach them organizational strategies. There are more and more children who are presenting with executive function struggles and ADHD (which poses challenges in organizing time and materials). The person to help these students is YOU!
You may be thinking, “My job is to teach students how to read and develop a strong number sense, not all of these additional responsibilities that are being thrusted on me”. However, when a student can’t find or easily access what they need for a lesson, they become off-task and distracted, or may even exhibit behaviors that affect the class as a whole. This directly impacts your ability to teach your students the content they need. More and more teachers are using flexible seating to meet the needs of their students, but a problem that many teachers face is how to store student supplies in the classroom.
Here is an example of how a teacher placed one of those plastic shelving units between the desks to store student supplies on. She also has chair pockets. As a desk-loather, I’m all for not using the desks as desks. This would be a great option for using them as “tables.”
3. Utilize the Space Underneath Your Tables
The third on the list of small classroom organization ideas is to use the space underneath tables. Adding plastic drawers or neat looking storage boxes under tables and desks maximizes storage room without taking up any additional floor space in the classroom since the table has already created a footprint. Adding a skirt or tablecloth to a table that students don’t sit at will allow you to store tubs and boxes underneath and out of site.
 |  |
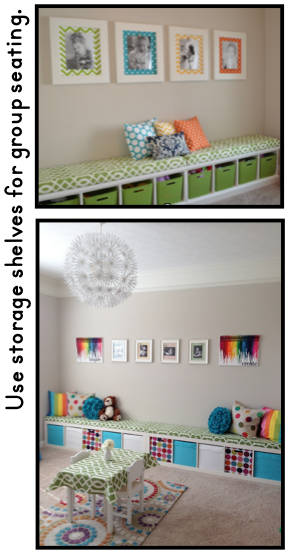
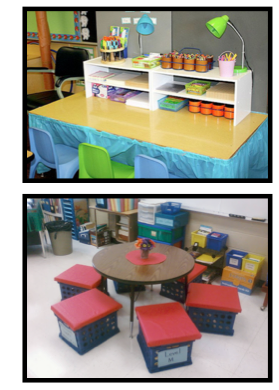
4. Utilize Storage Underneath Your Student Seating
Since you need places for your students to sit anyway you might want to consider creating seats that do double duty. Above are some storage crate seats made from plywood and plastic crates. Be sure to use quality crates or they will crack and bend.
Below are some bench seats. They were made by turning Ikea’s Expedits on their side. We have several of these at our house and they are a strong, quality piece of furniture. Wooden shelves are available at craft stores and unfinished wood stores would be a cheaper option. As an added bonus, you could paint them to match your classroom. These would make great benches at a rectangle small group teaching table or as seating in your whole group lesson area.
5. Add Storage on Top of Surfaces
The fifth on the list of small classroom organization ideas is to add storage on top of surfaces. Use cheap wooden shelves that are marketed for shoe storage. Add them to tabletops to create additional supply storage. Most big box stores offer them.
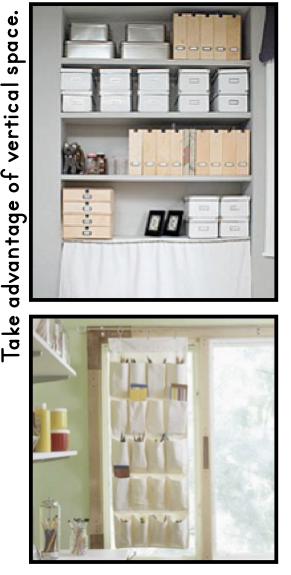
6. Take Advantage of Vertical Space
Always take advantage of your vertical space. Stacking boxes and wall-mounted shoe pockets are great ways to use space that would otherwise be wasted. Also, think about over the door and small mounted shelves for the backs of closets and cupboard doors.
7. Store Items Away You Do Not Currently Need to Access
The seventh on the list of small classroom organization ideas is to store away items you don’t need to access right now. Take advantage of deep shelving by placing storage containers filled with infrequently used items or seasonal books behind objects you use more often.
Seasonal Items
- You only need to access seasonal and holiday items once annually. Therefore if you have a storage area that is harder to get to than other it would make sense to use it for these types of items. Alternatively, if you are fortunate enough to have a lot of storage space at home, you may want to consider keeping these items there in easy to stack and carry tubs when they are not needed at school.
- Seasonal items tend to be varied in size. It is useful to use copy paper boxes or larger plastic bins to store these items.
- Always use containers with lids. Since you are not accessing them frequently you want to keep dust out.
- Consider storing all related items, including books, posters, borders, etc. together in one container.
- Posters and charts that are displayed on a wall or bulletin board can be rolled for storage. They will lie flat when stapled to the wall.
- Depending on how much you have to store, you may find it saves space to combine several holidays into one container.
- Use containers within the container. Keeping bulletin board trim, letters, fabric and accents in a Ziploc bag within the larger box will keep things neater and easier to access.
- Drawers are handy for storing seasonal and holiday items. However, they are not easy to move around. Also, they take up floor space. If you are considering changing schools or moving classrooms, then I suggest picking a different type of container because, although these may fit your current space, they may not be suitable for a future space.
- As a general rule, I try to limit items that are considered to be seasonal and get more bang for my buck by sticking to content areas when it comes to bulletin boards and displays.
- When I do a holiday-themed bulletin board, I will often forgo the overly thematic borders for a border that complements the theme but can be reused. For example, in place of a gingerbread man trim, I may opt for a red and white border that can also be used with a pink background for Valentine’s Day and then a blue background to display President’s Day writing.
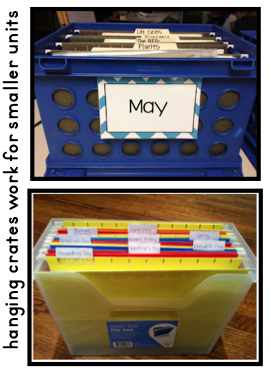
Thematic Units
Thematic units are a lot of fun and are a great way to engage your students and motivate them to really explore a subject. They often come with an abundance of objects, especially odd-shaped objects that are not easy to store. These storage challenges can lead to you feeling stressed and wasting time looking for the resources related to the unit you are working on. Does this sound familiar? If so, don’t worry! Below are 5 storage solutions for thematic units.
- Start by asking yourself what things you really need. Take a critical look at what you have and decide if you can part with some of the thematic units you’ve collected. If you don’t think you’ll be using some, then be sure to pass them on to someone who could use them and gift yourself some added space in the classroom.
- Inventory the items that you are storing and keep that list accessible on your computer. It will be helpful to know what materials and resources you already have as you plan to teach the unit in future years.
- You may want to consider a photo inventory as well. This makes it easy to see at a glance and serves as a reminder of what things look like if you are looking to add borders and other decorative details in the future.
- Binders are great for organization, but if you have some time or someone willing to help, you could scan your materials and save them to your computer for easier access instead.
- Team up with a colleague to house materials. It may be more space-efficient if you keep all of the solar system-themed materials in your classroom while she stores your penguin materials with hers. This works especially well if you collaboratively plan and share resources.
 |  |  |
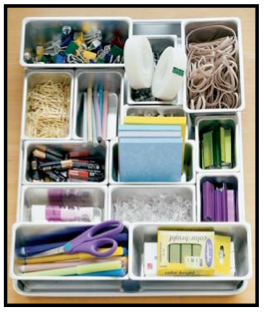
Overstock Supplies
Determine which supplies you actually need to have at your fingertips. Those are the ones you use throughout the day every single day. Some examples are pens, pencils, markers, clear tape, staples, a stapler, sticky notes, correction fluid, paper clips, and binder clips. We need to store them in a manner that will allow you to quickly and easily access them. Unless I am using my teacher computer, I’m typically not at my desk. Even when the kids aren’t in the classroom, I prefer to work at a table. Therefore, I found it very helpful to create a portable supply caddy that houses all of those items I use on a regular basis. I like being able to move it around the room with me or even take it up to the copy room if I’m working there.
 |  |
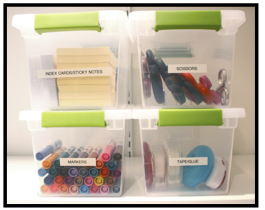
Overstock supplies, on the other hand, do not need to be stored in a place where you and your students can access them easily. Below are some suggestions to consider.
- Transform plastic drawers designed for sorting small hardware into an office supply station. You can get all kinds of fancy with spray paint, Washi tape, scrapbook paper and labels or you can simply purchase a set of drawers and use them as is. They are a great way to store all of those little supplies like brads, tacks, clips, and more.
- Use small containers to house extra supplies and store them in a deeper desk drawer or a larger bin out of sight.
- “Upcycling” containers that are the same size and shape create a much more organized appearance than storing all the supplies in their original packaging. It also allows you to merge several packages together. Some containers work really well for this purpose (Crystal Lite, baby food, baby wipes, etc.).
- You could invest in rolling carts or storage units.
- You could also purchase small baskets, food storage containers, pencil boxes, photo storage boxes, and plastic shoe boxes.
 |  |
8. Reduce Visual Clutter
The eighth on the list of small classroom organization ideas is to reduce visual clutter. I have some wall-mounted shelves in my classroom. I adore the storage. I loathe the visual clutter potential. I do have the items fairly self-contained and organized into smaller containers and boxes, but it still can be distracting to me… um, I mean the students. 🙂 So I cover it. Which is a win-win! Below is a before and after photo of the open shelving.
 |  |
Covering the shelves not only reduced the visual clutter and distraction to students, but also provided a place to display math reference charts, a number line and more. In years past, I covered it with butcher paper and made a timeline. I put a paper for each month and would add pictures of the things we did together. The downside to this was that it wasn’t too simple to lift and access the materials underneath.
 |  |
So this year I use black poster board and I now have small panels that lift easily. I attached them by simply creating “hinges” out of tape. At the bottom, I added a number line. I took the number line I already had and cut it down to fit each board. I used a yardstick to help make it straight. To make it fancy, I hot glued ribbon along the top of the number line, then finished it off by covering the tape at the top with more hot glued ribbon.
9. Create a System for Organizing Donations
If you receive donated tissues, paper towels, wipes, baggies, etc. from the families of your students then you probably find yourself in a situation where you need to find ways to store them in your classroom. My biggest issue with these items is the visual clutter they cause if they are not hidden out of sight. The boxes tend to be brightly colored with varied patterns and lettering. Therefore, it will create a much calmer learning environment if you don’t just stick these packages up on a shelf. Read below for some ways to conceal them.
- Cover copy paper boxes with gift wrap, fabric or contact paper that coordinates with your classroom. Use these to store the donated items together.
- Do you have deep shelves? I have one set that is deep enough that I can store some of the donated supplies. I store things like soaps, hand sanitizers, and wipes behind baskets that hold the kids art supplies. They are easy to get to when needed, but completely out of sight otherwise.
- In my school, the students have lockers in the hallway to store their coats, backpacks and other personal belongings. I have more lockers than students, so I use some extra lockers to hold boxes of tissues and paper towels.
- Remove baggies from the boxes. I divided a copy paper box into three sections. Then, I emptied all of the individual boxes of bags into one of the three categories (snack, sandwich and gallon). I was able to condense over 30 small boxes of bags into one copy paper box.
- Don’t ask for all the donations at once. In the past, we had included all of the items we needed onto the school supply list. On the first day of school, we were bombarded with donations. This year, my teaching partner and I realized that we still had enough supplies to get the year started. We didn’t include these donations on the original supply list. Instead, we set up a “Sign Up Genius” asking for a few of the things we started to run low on. We included things like wipes, tissues and paper towels. We had them replenished within days. I’m very optimistic that doing this will make the supplies so much more manageable.
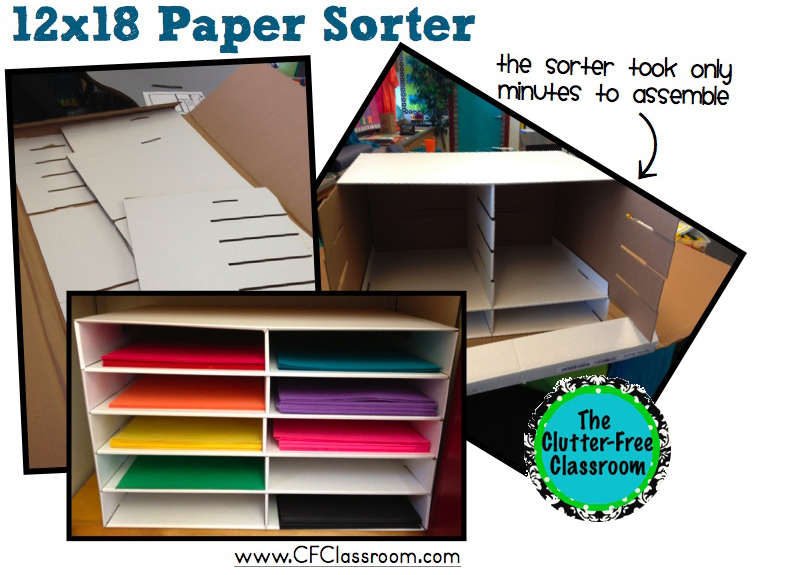
10. Invest in Organization Tools
The last on the list of small classroom organization ideas is to invest in organization tools. For example, large construction paper for art projects is so cumbersome. They are hard to store and quickly become disorganized when you need the color at the bottom of the pile. How can we organize these 12 x 18 sheets of construction paper? I have the solution: an oversized paper sorter! Check out below to learn more.
At a cost of $27.50, I have found the purchase to be well worth the money. Mainly because the big sheets of paper, and their lack of a proper home in my classroom, annoyed me for so long, but also because it has proven to be a quality product (despite being made out of cardboard).
I ordered the product on a Thursday and it was waiting for me when I walked into my classroom the following Monday (via free shipping). I assumed it would be a hassle to assemble, but it went together easily in under 8 minutes. A few folds and a couple slides later it was done. It required nothing more. No tools. No adhesives. No cutting. Nothing! It was so quick and easy.
It felt so sturdy! I’ve used it for a few months now. I am so happy with my purchase! As an added bonus, the entire unit slid onto a shelf in my closet so it is out of sight.
We hope you found this post about small classroom organization ideas helpful! If you did, then you may also be interested in my classroom organization guide, classroom organizing workshop, or these posts:
- How to Declutter Your Elementary Classroom
- Classroom Paper Organization Ideas for Elementary Teachers
- How Being Organized Positively Impacts Your Students