These holidays around the world crafts are perfect for elementary students to create in December for many reasons. First, they align with the cultural traditions that they learn about in a holidays around the world unit of study. They work for a Christmas around the world unit too! Second, they are very simple to assemble. You’ll be able to squeeze them into the school day easily.

If you are an elementary teacher, you know that December is a tricky month for instruction. Students are thinking about their Christmas lists, family traditions, and holiday celebrations with loved ones. Keep your kids engaged throughout the month of December through a holidays around the world unit. This allows you to tie in a highly engaging topic with your standards and curriculum. This topic lends itself to interactive, hands-on learning experiences that your students will love. The holidays around the world crafts below are a great example of that. Check them out below!

Christmas Around the World Crafts
Below are some Christmas around the world crafts for kids.
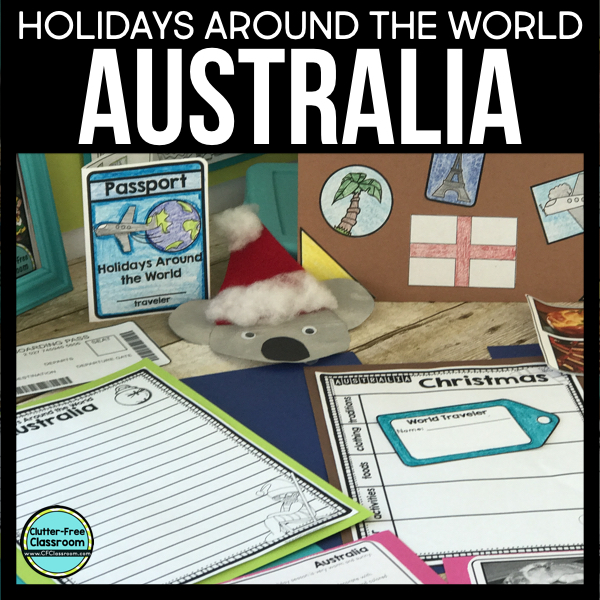
Australian Christmas Craft
The craft idea below is perfect for a Christmas in Australia unit during the month of December. This Australian craft requires a regular size paper plate, 2 small paper plates, gray acrylic paint, a paintbrush, black cardstock paper, red construction paper, cotton balls, googly eyes, a black marker, a stapler, and glue.
- Start by painting the bottom of your paper plates gray and set them aside to dry completely. While your plates are drying, cut an oval nose out of your black card stock paper.
- Once your plates are dry, staple the two smaller plates onto the large plate to make ears. Press along the middle circle of the small plates so they curve upward instead of down. Then cut slits along the bottom of the ears so it looks like hair.
- Glue your nose and googly eyes onto your koala. Finish your koala by using your black marker to draw a mouth onto it.

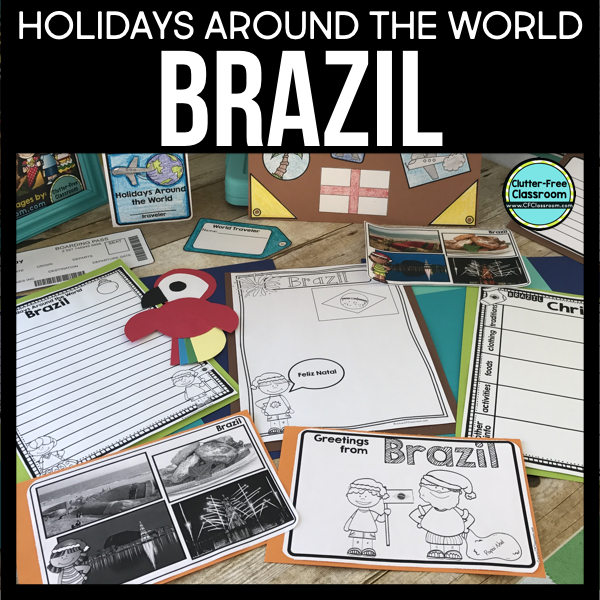
Brazil Christmas Craft
This craft idea is a perfect complement to a Christmas in Brazil unit in December. In order to do this Brazil Christmas craft, you will need 3 red mini or regular cupcake liners or colored paper, orange, blue, green, & yellow cupcake liners black, white, and brown card stock paper, colored paper, scissors, a 2-inch circle punch, a hole punch, and a glue stick.
- Start by getting all of your pieces ready for your parrot. Cut one of your red cupcake liners in half for the wings. Also, cut your blue, orange, yellow and green cupcake liner in half. You will only need one half piece for all of those colors. You’ll also need a 2-inch black and white circle. Cut one- quarter of the black circle out for the beak and use your hole punch to make the eye. Lastly, you’ll need a brown strip for the branch.
- Once you have your pieces ready, glue and assemble your parrot onto your card stock paper. Start by gluing your brown branch onto your paper and then glue and layer your two red cupcake liners to make the parrot’s head and body.
- Glue your white 2-inch circle onto the face along with the beak and eye.
- Finish your parrot by overlapping and gluing the colorful tail feathers on and the two red wings.

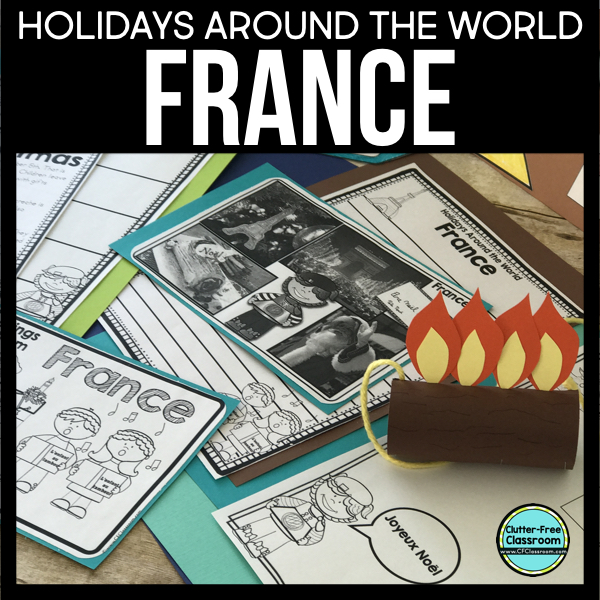
France Christmas Craft
The French craft idea below is perfect for a Christmas in France unit during the days leading up to winter break. This France Christmas craft requires a toilet paper roll, brown construction paper, red and yellow colored paper or cellophane, a black marker, string or yarn, scissors, glue, tape, and glitter.
- Cut a brown piece of construction paper big enough to wrap the toilet roll with a little extra sticking out on the ends.
- Cover the toilet roll with glue and wrap with the brown paper, folding the excess down inside the toilet roll.
- Use a black marker and draw wavy lines on the outside to simulate bark.
- Cut out four little flame shapes from red and yellow paper or cellophane. Glue to the top of the log.
- Tape the ends of a short length of string inside the ends of the toilet roll.
- Apply a little more glue at the top under the flames and sprinkle with red glitter.
- Hang on a tree.

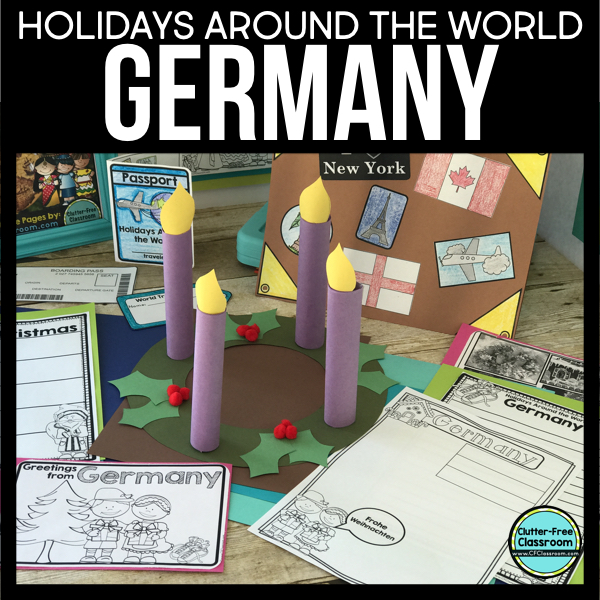
Germany Christmas Craft
This craft idea is great for a Christmas in Germany unit during the month of December. In order to do this Germany Christmas craft, you will need dark green paper, light green paper, 2 purple papers, 12 small red pompoms, yellow paper, scissors, and glue.
- Cut a large circle from the dark green paper. Fold the circle in half to cut out the middle in a circular shape as well. This will form the wreath.
- Draw 8 leaf shapes onto the light green paper. Cut out with scissors.
- Attach the leaf shapes in groups of 2 equidistance around the wreath. Glue the pompoms in groups of three onto the leaves as shown in the photo.
- Cut both of the purple papers in half. Roll each of those four rectangles into tubes and secure with tape.
- Draw 4 flames onto the yellow paper. Cut out with scissors. Attach one flame to each tube.
- Glue each of the four candles onto the wreath in between the leaves.

Holland Christmas Craft
The craft idea below is a perfect complement for a Christmas in Holland unit in December. This Holland Christmas craft requires yellow construction paper, scissors, and tape or staples.
- Start by folding your paper in half, then in quarters. Fold one corner in.
- Fold the paper in thirds the opposite direction. The diagonal fold will help, because both spots where the diagonal fold meets a horizontal fold represents a third of the page.
- Cut away the top two squares, and cut slits into the bottom, splitting the bottom three squares.
- Use the slits to make the back of the shoe and then tape into place.
- Fold together the front of the shoe and then tape or staple in place.
- Stuff with fake grass or straw.

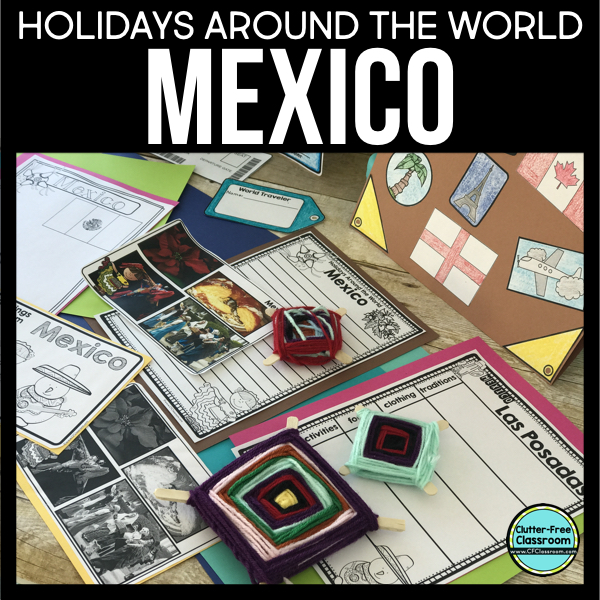
Mexico Christmas Craft
This craft idea is perfect for a Christmas in Mexico unit during the month of December. In order to do this Mexico Christmas craft, you will need popsicle craft sticks, tape, yarn of multiple colors, and scissors.
- Start by making a + sign with your craft sticks and adding a little piece of tape to hold them together until you get started.
- Make an X with the yarn around the middle where the sticks cross over.
- Bring the yarn up and over one side of the + and then turn counter-clockwise and bring it up and over the next leg. Turn and bring it over, turn and bring it over. Over and over, until it’s done.
- Either tuck the last bit in or tape it down. It’s up to you!

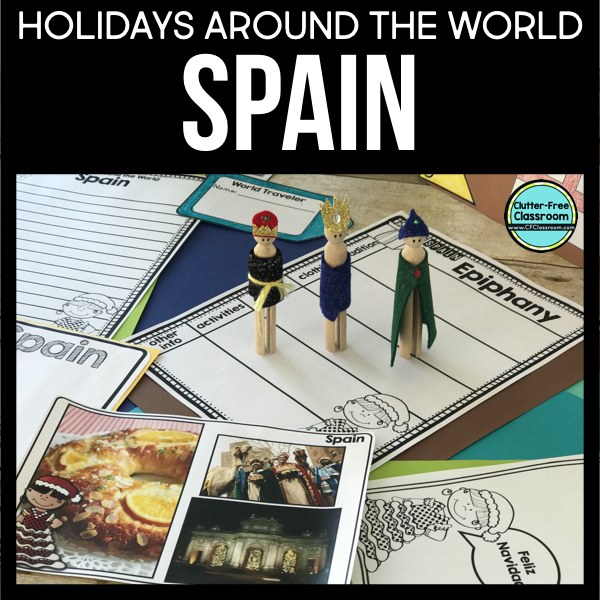
Spain Christmas Craft
The craft idea below is a great addition to a Christmas in Spain unit in December. This Spain Christmas craft, which can also be used as a three kings day craft, requires wooden clothespins, scissors, glue, scraps of fabric or felt, a black marker and small sequins, beads, or other craft materials as accents.
- Provide the students with a clothespin and small pieces of felt or fabric.
- Encourage them to be creative in how they use it to create robes or clothing.
- Secure their “clothing” to the clothespin using glue.
- Draw eyes (and other facial features if desired) using a black marker.
- Add the small, decorative accents as embellishments.

Other Holidays Around the World Crafts
Below are some holidays around the world crafts for kids.
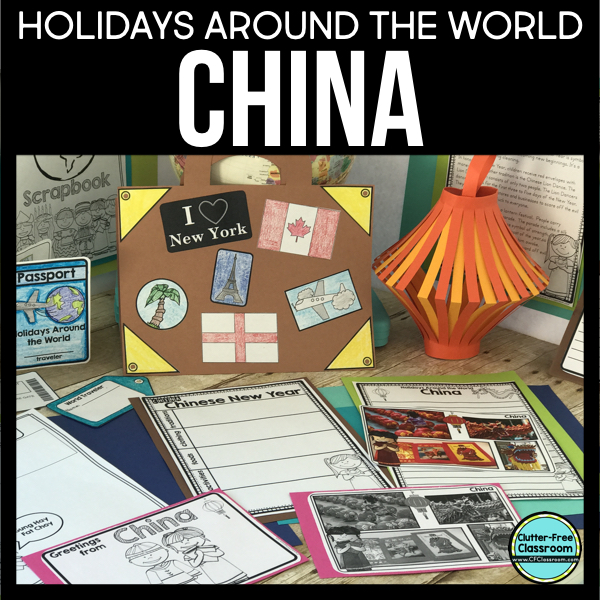
Chinese New Year Craft
This craft idea is perfect for a Chinese New Year unit during the colder months of December, January, or February. In order to do this Chinese New Year craft, you will need colored paper, pencil and eraser, a ruler, scissors, tape or stapler, string or twine, and markers.
- Start with colored paper. You can use copier/computer paper (letter-size) or construction paper (9″ by 12″). Cut off a strip of paper 1⁄2″ wide from one end of the paper that measures the width of the paper. Fold the sheet of paper in half lengthwise.
- Mark a line across the length of the folded paper 1⁄2″ in from the open edge. Make marks every 1⁄2″ along this line, then draw lines at each mark straight to the folded edge, marking 1⁄2″ wide strips. Cut on these lines from the folded edge to the original marked line. Cut through both layers of paper. Open the paper flat. If the marks are very noticeable, gently erase them.
- Bring the edges together in a cylindrical shape with the cut strips running vertically. Be sure that the fold is on the outside of the lantern. Tape or staple the edges together at the top, middle, and bottom.
- Attach the handle, cut in Step 1, to one end of the lantern with tape or staples. The lanterns will stand on their own. They can be hung individually from their handles or loosely tied at intervals along a cord or rope hung overhead.

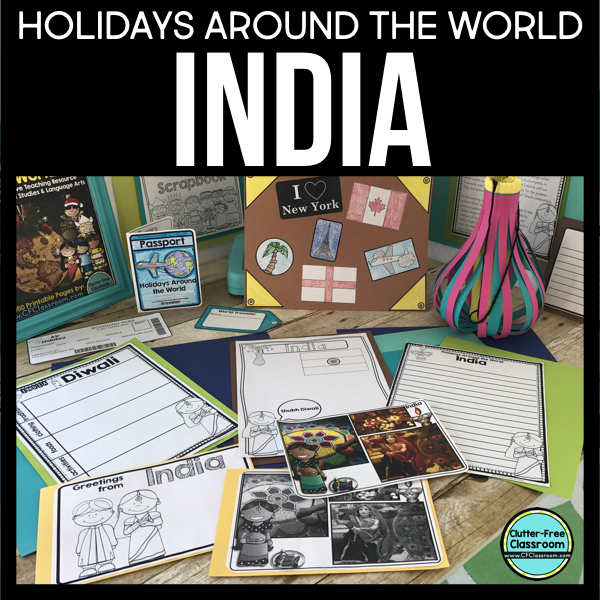
Diwali Lantern Craft
The craft idea below is a great addition to a Diwali in India unit in November or December. This Diwali lantern craft requires 2 different brightly-colored papers, 1 yellow sheet of paper, scissors, a pencil, string or yarn, and tape or stapler.
- Start by rolling the yellow paper into a cylinder attaching the ends to form a tube with an opening on the end that is about an inch wide.
- Fold one of the other papers in half to form a long and skinny rectangle.
- Holding the paper horizontally so the length is greater than the height, draw pencil marks (spaced about 1 inch apart) on one side of the paper from the fold at the top towards the bottom. Stop one inch from the edge.
- Cut along the pencil lines. Be sure not to cut all the way to the edge.
- Repeat the steps with the second colored paper.
- Open up both colored papers and roll them so both sides of the paper overlap a bit. Connect both of the ends by stapling them into place to form a cylinder around your yellow tube.
- Using the hand-held punch, make two holes in the top across from each other. Tie string through the holes to hold the lanterns.

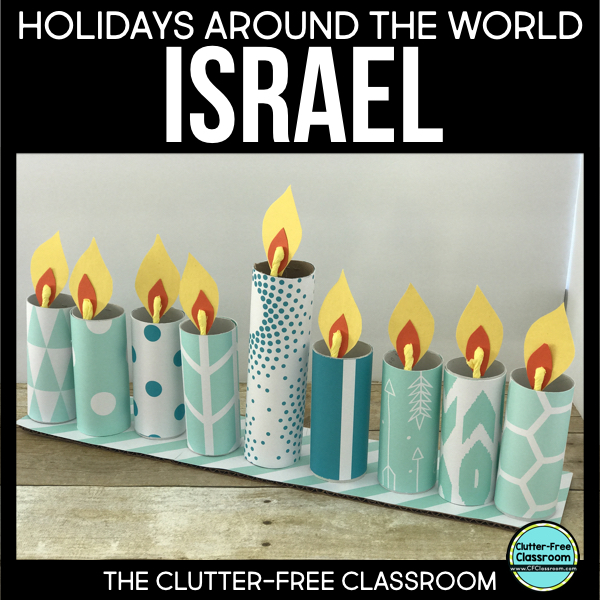
Menorah Craft for Hanukkah
This craft idea is great for a Hanukkah in Israel unit during the days leading up to winter break. In order to do this menorah craft for Hanukkah, you will need cotton swabs, 3×12 inch piece of corrugated cardboard, scrapbook paper, colored or patterned paper, orange card stock paper, yellow tissue paper, tacky glue, a ruler, and scissors.
- For the base, cover a 3- by 12-inch piece of corrugated cardboard with scrapbook paper.
- Roll and tape 8 4-by-5 inch paper rectangles, and one that’s 4-by-7 inches, to form tubes.
- Dip one end of each tube in tacky glue and place the tubes on the base.
- For each flame, cut a teardrop shape from orange card stock and a slightly larger teardrop from yellow tissue paper. Cover the orange piece with glue, then place a cotton swab on top. Smooth the tissue paper over the orange paper and swab, then let dry.
- To make your flames sit taller in their holders, pack crumpled tissue paper inside the tubes. Place the flames inside the tubes.

Kwanzaa Craft
The craft idea below is a perfect complement for a Kwanzaa in the U.S.A unit in late December or early January. This Kwanzaa craft requires red card stock, green card stock, black card stock, scissors, a ruler, a pencil, and an eraser.
- Fold the card in half lengthways. Cut long lines in the card about 1 inch apart and about 1 inch from the edge of the card.
- Cut the paper into strips about 1 inch wide. Take a strip of paper and pass it under the red card and then up through the first slit, down through the second and back up through the third and so on until you reach the other side of the card. Push it up so it sits as close to the top of the red card as it can reach.
- Repeat with a different colored strip of paper, starting the other way, down through the first slit and up through the second and so on. Repeat until the card is full.
- Laminate if desired to protect your mat.

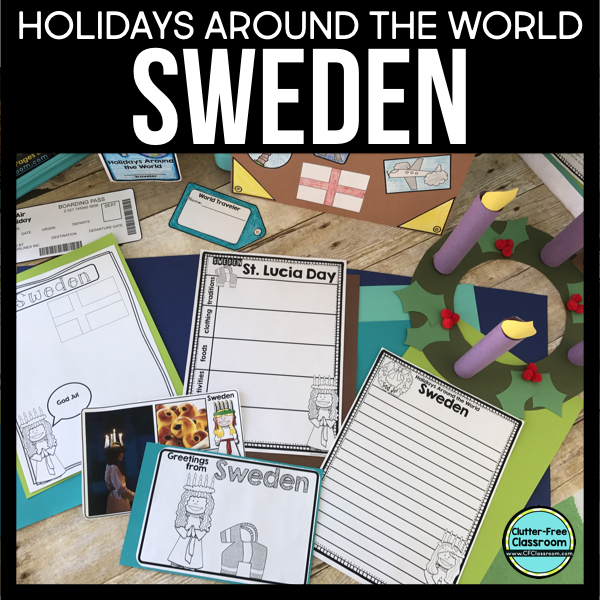
St. Lucia Day Craft
This craft idea is great for a St. Lucia Day in Sweden Unit during the month of December. In order to do this St. Lucia Day craft, you will need white construction paper, colored construction paper, scissors, glue sticks, skin tone markers, and gray markers.
- First, cut out a tall, skinny triangle with a scoop off the bottom. You will also need a half oval shape for the body.
- Next, using the hat and body as a guide, draw out a beard onto your white paper. It should be almost as long as your body and the top should be the width of the hat’s bottom. Add in plenty of streaks of grey to give it a hair look.
- Color in an oval with your skin toned marker and cut it out along with the beard.
- Paste the body off to the side on the piece of card stock. Line up the beard and the corner of the hats to see where you will need to color in the face. Fill in that area, it should be a long skinny oval shape. Then, glue on the hat and the beard.
- At the top of your page, fold your hat off to the side, add a dab of glue, then fold down.
- Add on your nose and draw on two little eyes to finish.

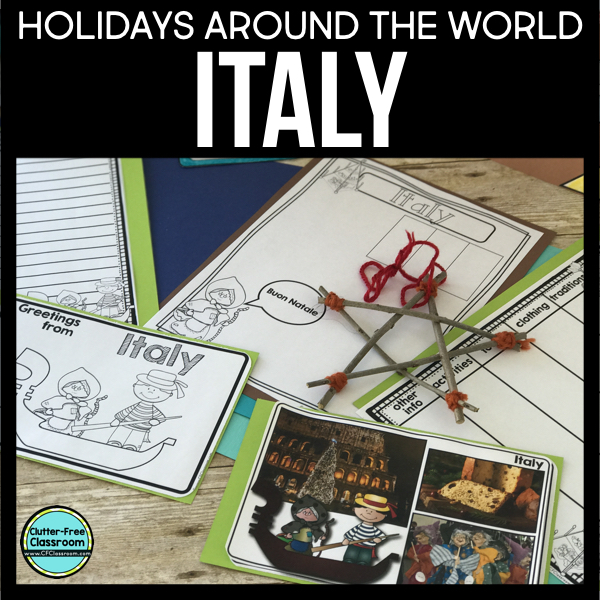
Epiphany Craft
The craft idea below is a great addition to a Three Kings Day and Epiphany in Italy Unit during the days leading up to or returning from winter break. This Epiphany craft requires wooden twigs or popsicle sticks, colored markers or paint, glue, glitter, thread or ribbon, and a variety of small beads, confetti, and other decorative items.
- Color the popsicle sticks twigs using markers or paint.
- Glue the popsicle sticks or twigs into a star shape.
- Decorate your star with glue and glitter or any of the other items you have.
- Tie or glue a loop of thread or ribbon for the hanger.

Related Holidays Around the World Resources
Check out these other holidays around the world resources!
| 
| 
| 
|
| LEARN MORE | BUY NOW | LEARN MORE | BUY NOW | LEARN MORE | BUY NOW | LEARN MORE | BUY NOW |

| 
| 
| 
|
| LEARN MORE | BUY NOW | LEARN MORE | BUY NOW | LEARN MORE | BUY NOW | LEARN MORE | BUY NOW |
These holidays around the world crafts are great additions to my comprehensive holidays around the world unit. You may also find these holiday videos for kids and holiday children’s book lists to be helpful resources as well! Your elementary students are going to love these holiday crafts from around the world and learning about different cultures and sets of traditions.


